TL;DR: Internal servers can’t use standard ACME validation — they’re not reachable from the internet, and exposing your DNS API key for DNS-01 isn’t always an option. This article solves it with an ACME proxy (Step CA + acme-proxy) that turns internal HTTP-01/DNS-01 orders into external DNS-01 orders, plus an ACME DNS server that hosts the challenge records via a CNAME trick. It walks through the full setup (MariaDB, NGINX, Lab-CA, ACME DNS, and a split-DNS Unbound resolver) and ends by issuing both an HTTP-01 and a DNS-01 wildcard certificate.
Homelab and ACME TLS Certificates
A couple of months ago, I saw on Mastodon that someone was asking how to handle TLS certificates inside a homelab. This problem isn’t unique to homelabs — it affects anyone who runs servers that aren’t directly accessible from the internet but still wants to use ACME-ordered certificates.
There are two types of certificates you can use:
- Private — signed by your own CA
- Public — issued by a CA trusted by the public
Private Certificates
Private certificates are a great way to sign your certificates.
Pros:
- They cost nothing
- They don’t appear in Certificate Transparency logs
Cons:
- You need to install your CA into the certificate stores of every client that accesses the services
- When using container images (e.g., Docker), you need to include the CA in each image
- Python’s
certifimodule uses its own certificate store, making it difficult to add your own CA
Because of these limitations, using a private CA isn’t always feasible for internal networks.
Software that can be used for internal ACME:
Lab-CA has a nice GUI that provides extra features missing from Step CA. The advantage of Step CA is that it’s simpler and lighter to install and run.
Public Certificates
Using public certificates has one major disadvantage: they get added to Certificate Transparency logs. This gives hackers and other bad actors reconnaissance data on what you have running.
Let’s Encrypt is free to use, but the entire infrastructure still needs to be paid for, so they operate on donations.
When you run servers that aren’t reachable from the internet, ACME validation via the HTTP-01 challenge isn’t possible. With the DNS-01 challenge, the server needs API access to the DNS zone, which isn’t always possible or desirable.
- DNS-01 — With DNS API credentials, you can do more than just create
_acme-challengeTXT records; you can also modify critical IP addresses in your most important DNS records - HTTP-01 — Your internal endpoint needs to be reachable from the internet
ACME Proxy
By using ACME Proxy, you can order TLS certificates without internet connectivity. The ACME proxy handles external ordering and validation for internal ACME clients (such as certbot).
Internally, the ACME proxy converts internal HTTP-01 and DNS-01 ACME requests into external DNS-01 ACME orders. It validates internally that the requester is authorized.
The ACME proxy supports two modes:
External Account Binding (EAB)
EAB is an additional account that links multiple ACME accounts together. Some external ACME providers, such as ZeroSSL, support EAB. With EAB, all orders made via ACME proxy are assigned to that account.
The advantage of EAB is that you can group all your certificates under one external account. ACME proxy claims that with EAB, you only need to verify a domain once, and all subdomains of the verified domain are automatically trusted. I was unable to verify this claim using ZeroSSL.
DNS-01 TXT
DNS-01 TXT uses the DNS-01 challenge protocol to let the upstream ACME provider validate the order. This means ACME proxy places the challenge in the DNS provider so that the ACME provider can validate it. Without EAB, the upstream provider cannot group different ACME accounts together.
ACME DNS
If you don’t want to expose your DNS API key, or you don’t have a DNS server with an API, you can use ACME DNS as a bridge for ACME validation. It acts as a local DNS server that can handle _acme-challenge TXT records, allowing internal services to validate their domains without exposing your main DNS API keys.
The ACME provider expects the TXT record _acme-challenge.DOMAIN to exist at the time of validation. This can be either a direct TXT record or a CNAME record pointing to a TXT record.
This last trick is what ACME DNS uses. You create an account on the ACME DNS server via an API call and receive a DNS address back. You then use this DNS name to create a CNAME record. Finally, you configure certbot to use this ACME DNS server as its DNS plugin.
When you order the certificates, the ACME bot places the challenge TXT record on the ACME DNS server. The ACME provider follows the CNAME record to the ACME DNS server and finds the TXT record there.
Network Overview
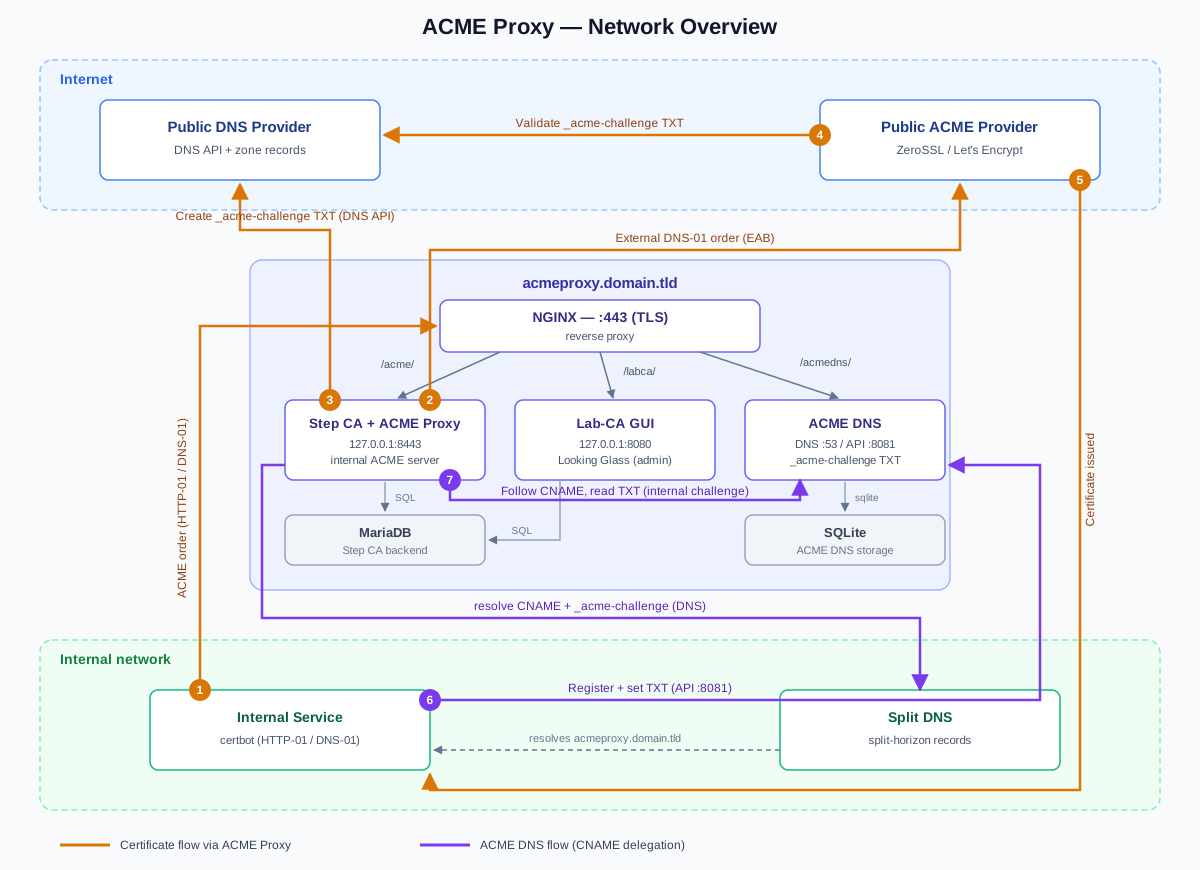
The diagram below shows how all components work together. The numbered amber steps follow a certificate order from an internal client to the public ACME provider and back; the violet steps show the ACME DNS flow, where the public ACME provider follows a CNAME to the ACME DNS server to read the challenge TXT record.
Installation Steps
Install MariaDB
MariaDB will be used as the backend for Step CA, which ACME Proxy uses to handle internal ACME clients.
apt install mariadb-server mariadb-client
- Create a user for Step CA
- Create a database for Step CA
Install ACME Proxy
-
For convenience, I used the untrusted installation method:
curl -fsSL https://raw.githubusercontent.com/esnet/acme-proxy/main/install.sh | sudo sh -
Configure the
ca.jsonfile:- Configure Step CA to use MariaDB as the backend
- Configure DNS API settings
- Configure EAB settings
- Set the
commonNameanddnsNamesfor the ACME server - Set the Step CA listener to port
8443onlocalhost
Install NGINX
-
Install NGINX with certbot:
apt install nginx python3-certbot-nginx -
Request an NGINX TLS certificate (this creates the base config with the correct TLS certificate):
certbot --nginx -d acmeproxy.domain.tld --agree-tos -m EMAIL --server https://localhost:8443/acme/acme/directory --no-verify-ssl -
Configure the NGINX location paths:
/etc/nginx/sites-enabled/default
location /acmedns/ {
    proxy_pass http://127.0.0.1:8081/;
    proxy_set_header Host $host;
    proxy_set_header X-Real-IP $remote_addr;
    proxy_ssl_verify off;
}

location /acme/ {
    proxy_pass https://127.0.0.1:8443/acme/;
    proxy_set_header Host $host;
    proxy_set_header X-Real-IP $remote_addr;
    proxy_ssl_verify off;
}

location /labca/ {
    proxy_pass http://127.0.0.1:8080/;
    proxy_set_header Host $host;
    proxy_set_header X-Real-IP $remote_addr;
    proxy_ssl_verify off;
    proxy_set_header X-Request-Base "/labca";
    proxy_set_header X-Forwarded-For $proxy_add_x_forwarded_for;
    proxy_set_header X-Forwarded-Proto $scheme;
}
Install lab-ca.net
I used the standalone method, which allows Step CA / ACME Proxy to handle the requests while providing a “Looking Glass” interface for viewing ordered certificates.
-
Download the Lab-CA
.debpackage:wget https://github.com/hakwerk/labca/releases/download/v26.04/labca-gui_26.04_amd64.deb -
After installing Lab-CA, initialize the configuration. Specify the database and enable standalone mode. In this mode, Lab-CA uses the database as its sole source and doesn’t write any information directly.
-
Install the systemd service:
labca-gui -config /opt/acme-proxy/ca.json/etc/systemd/system/labca-gui.service
[Unit] Description=ACME Proxy CA GUI After=network.target [Service] Type=simple ExecStart=/usr/bin/labca-gui -config /opt/acme-proxy/ca.json Restart=on-failure RestartSec=5 # Security hardening (optional - adjust as needed) NoNewPrivileges=true ProtectSystem=strict ProtectHome=true ReadWritePaths=/opt/acme-proxy [Install] WantedBy=multi-user.target -
Reload systemd and enable the Lab-CA GUI:
sudo systemctl daemon-reload
sudo systemctl enable --now labca-gui.service
sudo systemctl status labca-gui.service
Install ACME DNS for the Local Network
An internal ACME DNS resolver only works with a split-DNS setup, since public and internal DNS records differ.
ACME DNS is written in Go and needs to be compiled. See the ACME DNS installation manual for instructions.
-
Copy the compiled
acme-dnsbinary to/usr/local/bin -
Configure ACME DNS:
/etc/acme-dns/config.cfg
[general] # DNS interface. Note that systemd-resolved may reserve port 53 on 127.0.0.53 # In this case acme-dns will error out and you will need to define the listening interface # for example: listen = "127.0.0.1:53" listen = "[::]:53" # protocol: "both", "both4", "both6", "udp", "udp4", "udp6", "tcp", "tcp4", "tcp6" protocol = "both" # domain name to serve the requests off of domain = "acmeproxy.domain.tld" # zone name server nsname = "acmeproxy.domain.tld" # admin email address, where @ is substituted with . nsadmin = "admin.sapiolab.nl" # predefined records served in addition to the TXT records = [ # domain pointing to the public IP of your acme-dns server "acmeproxy.domain.tld. A 192.168.0.13", "acmeproxy.domain.tld. AAAA 3fff::443", # specify that auth.example.org will resolve any *.auth.example.org records "acmeproxy.domain.tld. NS acmeproxy.domain.tld.", ] # debug messages from CORS etc debug = false [database] # Database engine: sqlite3 or postgres engine = "sqlite3" # Connection string. For sqlite3: filename; for postgres: postgres://$username:$password@$host/$db_name # Note: the default Docker image uses /var/lib/acme-dns/acme-dns.db for sqlite3 connection = "/var/lib/acme-dns/acme-dns.db" # connection = "postgres://user:password@localhost/acmedns_db" [api] # listen IP, e.g. 127.0.0.1 ip = "127.0.0.1" # disable registration endpoint disable_registration = false # listen port, e.g. 443 for default HTTPS port = "8081" # possible values: "letsencrypt", "letsencryptstaging", "cert", "none" tls = "none" # only used if tls = "cert" tls_cert_privkey = "/etc/tls/sapiolab.nl/privkey.pem" tls_cert_fullchain = "/etc/tls/sapiolab.nl/fullchain.pem" # only used if tls = "letsencrypt" acme_cache_dir = "api-certs" # optional email address to which Let's Encrypt will send expiration notices for the API's cert notification_email = "" # CORS AllowOrigins (wildcards can be used) corsorigins = [ "*" ] # use HTTP header to get the client IP use_header = false # header name to pull the IP address / list of IPs from header_name = "X-Forwarded-For" [logconfig] # logging level: "error", "warning", "info" or "debug" loglevel = "info" # possible values: stdout, TODO file & integrations logtype = "stdout" # file path for logfile TODO # logfile = "./acme-dns.log" # format: "json" or "text" logformat = "text" -
Create the service user:
sudo useradd -d /var/lib/acme-dns/ -r -s /usr/sbin/nologin acme-dns -
Create the database directory:
mkdir /var/lib/acme-dns/ chown acme-dns:acme-dns /var/lib/acme-dns/ -
Create the systemd service:
/etc/systemd/system/acme-dns.service
[Unit] Description=Limited DNS server with RESTful HTTP API to handle ACME DNS challenges easily and securely After=network.target [Service] User=acme-dns Group=acme-dns AmbientCapabilities=CAP_NET_BIND_SERVICE WorkingDirectory=~ ExecStart=/usr/local/bin/acme-dns Restart=on-failure [Install] WantedBy=multi-user.target -
Since ACME DNS listens on
::(both IPv4 and IPv6), it will conflict with systemd-resolved. Disable the stub listener:Add to
/etc/systemd/resolved.conf:DNSStubListener=no -
Restart systemd-resolved:
systemctl restart systemd-resolved -
Load the new ACME DNS service:
sudo systemctl daemon-reload
sudo systemctl enable --now acme-dns
ca.json
{
  "address": "localhost:8443",
  "authority": {
    "backdate": "1m0s",
    "config": {
      "account_email": "EMAIL",
      "ca_url": "https://acme.zerossl.com/v2/DV90",
      "dns01_txt": {
        "dns_servers": [
          "ns61.UPSTREAMDNS.net:53",
          "ns62.UPSTREAMDNS.com:53",
          "ns63.UPSTREAMDNS.net:53",
          "ns64.UPSTREAMDNS.uk:53",
          "pns61.UPSTREAMDNS.net:53",
          "pns62.UPSTREAMDNS.com:53",
          "pns63.UPSTREAMDNS.net:53",
          "pns64.UPSTREAMDNS.uk:53"
        ],
        "env_vars": {
          "PDNS_API_KEY": "PowerDNS API key",
          "PDNS_API_URL": "http://ns.example.tld:8081/"
        },
        "provider": "pdns"
      },
      "eab_hmac_key": "EAB_HMAC_KEY",
      "eab_kid": "EAB_KID",
      "metrics": {
        "datasource": "/opt/acme-proxy/db/metrics",
        "enabled": true,
        "port": 9234
      }
    },
    "provisioners": [
      {
        "claims": {
          "allowrenewalafterexpiry": false,
          "disablerenewal": false,
          "disablesmallstepextensions": true,
          "enablesshca": false
        },
        "name": "acme",
        "options": {
          "ssh": {},
          "x509": {}
        },
        "type": "ACME"
      }
    ],
    "type": "externalcas"
  },
  "backend": "step-ca",
  "commonname": "acmeproxy.domain.tld",
  "config": {
    "complete": true
  },
  "db": {
    "conn": "stepca:DBPASS@tcp(127.0.0.1:3306)/stepca",
    "database": "stepca",
    "datasource": "stepca:DBPASS@tcp(127.0.0.1:3306)/",
    "type": "mysql"
  },
  "dnsnames": ["acmeproxy.domain.tld"],
  "keys": {
    "auth": "",
    "enc": ""
  },
  "logger": {
    "format": "json"
  },
  "server": {
    "addr": "localhost",
    "cert": "/opt/acme-proxy/labca.crt",
    "https": false,
    "key": "/opt/acme-proxy/labca.key",
    "port": 8080,
    "session": {
      "maxage": 3600
    }
  },
  "standalone": true,
  "tls": {
    "maxversion": 1.3,
    "minversion": 1.1,
    "renegotiation": false
  },
  "user": {
    "email": "EMAIL ADDRESS",
    "name": "admin",
    "password": "PASSWORD OF LABCA"
  }
}
Configure the ACME requester
Configure the local split-DNS zone
Certbot, acme-dns-client, and the ACME proxy all use this internal DNS resolver to validate the challenge, and to verify that the correct records are in place before the ACME order.
I use Unbound as the DNS resolver; it is also the authoritative DNS server for the internal domain.
- acme-dns-client validates that the correct CNAME points to the right acme-dns account. It queries the authoritative DNS server, so it is important that the NS record for that domain points to the authoritative server of the internal domain.
- The ACME proxy validates the challenge before it requests the upstream ACME certificate.
In my local Unbound resolver I use the following config:
local-zone: "dns-01-cert.domain.tld." static
local-data: "dns-01-cert.domain.tld. NS localns.dns-01-cert.domain.tld."
local-data: "localns.dns-01-cert.domain.tld. AAAA 3fff::56"
local-data: "http-01-cert.domain.tld. AAAA 3fff::60"
local-zone: "_acme-challenge.dns-01-cert.domain.tld." redirect
local-data: "_acme-challenge.dns-01-cert.domain.tld. CNAME 1cc29dbd-a675-4cb0-8cad-42d9d81f649d.acmeproxy.domain.tld."

stub-zone:
    name: "acmeproxy.domain.tld."
    stub-addr: 3fff::13
- The NS record points to the local authoritative DNS server, so acme-dns-client knows who to ask for the CNAME and does not poison the cache of the DNS resolver.
http-01-cert.domain.tldis the web server; for this certificate we use the HTTP-01 challenge.dns-01-cert.domain.tldwill be a wildcard, so the DNS-01 method is used. No A record is required for DNS-01.- The sub-zone is the DNS zone of the ACME-DNS server.
- Since the network supports it, we use IPv6 addresses.
Create an HTTP-01 ACME certificate
On the web server we install NGINX and certbot:
sudo apt install python3-certbot-nginx nginx
To request the certificate we run:
sudo certbot -v --nginx --agree-tos --email EMAIL --server https://acmeproxy.domain.tld/acme/acme/directory -d http-01-cert.domain.tld
This command will:
- configure NGINX for the HTTP-01 challenge
- also set up a new vhost that uses the new certificate
Create a DNS-01 certificate using ACME-DNS
To request a wildcard or another DNS-01 certificate we follow these steps:
-
Download and install acme-dns-client (a pre-compiled Go application):
cd /tmp/ wget https://github.com/acme-dns/acme-dns-client/releases/download/v0.3/acme-dns-client_0.3_linux_amd64.tar.gz -O /tmp/acme-dns-client.tar.gz tar -xvzf acme-dns-client.tar.gz acme-dns-client mv acme-dns-client /usr/local/bin/ -
Request an acme-dns account using the register command:
sudo acme-dns-client register -s https://acmeproxy.domain.tld/acmedns/ -d dns-01-cert.domain.tld -
The register command returns the CNAME we need to add to the DNS server. The CNAME destination does not exist yet.
-
acme-dns-client checks that the CNAME is correctly installed.
-
Request the wildcard certificate. acme-dns-client installs the challenge in the DNS record using the acme-dns API:
sudo certbot certonly --agree-tos --manual --preferred-challenges dns --manual-auth-hook 'acme-dns-client' --email EMAIL --server https://acmeproxy.domain.tld/acme/acme/directory -d dns-01-cert.domain.tld. -d *.dns-01-cert.domain.tld.
#homelab #selfhosting #tls #infosec
Comments
You can respond to this post on Mastodon: 🔗 or click to copy the URL to your clipboard so you can paste it into your client.